Gifting has today been misinterpreted to the most a person can spend on an item they buy for another. While the more expensive the gift, the better is the notion, there are people who appreciate the gesture of love that comes with it. There is no better friendship gift to give other than well designed custom made bracelets. You can definitely purchase them online but where will be the pride in it when you can learn how to make one by yourself? The rooms for mistakes exist, however with the different guides there are online; it becomes easier to improve your art. Compiled in this guide are some of the unique designs you can consider on how to make friendship bracelets today.
Materials Needed
- A pair of scissors
- Embroidery floss (16 strands 20” by 50 cm)
- Glue
- Piece of cardboard
Step 1
There are different patterns that bracelets can be made in, however the structure or method used is always the same. To commence your project on making friendship bracelet, start by finding a braiding disk or consider downloading one from the internet. The disc is supposed to help you get right the pattern for the threads used for the process. Poke a hole at the center of the disk and cut slightly into the markings of the disk to create slots on the disk that could hold onto the threads as you make a pattern.
Step 2
Most braiding discs will tell you the number of threads you can use for each pattern to come to life. It is only right that you adhere to the different patterns requirements guided by the disk if you are to get the bracelet right. Each piece of thread or embroidery floss should measure about 20” by 50 cm. Tie a loose knot at the end of the thread and another tight one at the other end. Poke the end of the thread with tight knot through the hole on your braiding disk and clip the threads according to the colored dots on your disk. The start point of your braiding only matters when commencing otherwise you can always resume the braiding from any point of the braiding disk.

Step 3
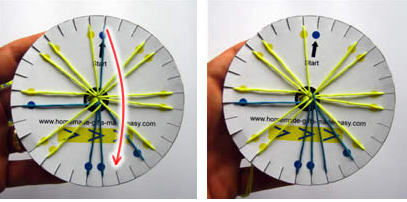
There is the start mark from which two colored dots indicate respective colors passing through. Take the thread to your right from the two at the start point and remove it to place it directly opposite of the rope on the lower half of the disk. You then have to take the thread to the left of the southern center point and place it on the left side of the north middle point of the disk as illustrated in the images below. By repeating these processes and rotating the disk, you end up creating a unique pattern as designed on the disk.
Step 4
As you continue braiding between your breaks, you will find a unique design bracelet coming down through the hole located at the center of the disk. Tug the bracelet from time to time to avoid it from tangling and besides combing can also ease the situation.
Step 5
After you are finished with braiding the threads on your braiding disk, you will need to seal the other end of the bracelet with quality knots. You are furthermore required to have another knot to make it two on one end of the rope to help with designing the closing mechanism. To wear the bracelet you have to poke it through its braids between the two tied knots on the same end.
Can I Make Many of Them?
Through using the cardboard design, you can have an easy time braiding your threads into the required design. You can therefore make a lot of bracelets using this design based on the time you have. It is for this reason you should buy a quality braiding disk that can be relied upon for making it through different projects that you will have.
Pointers To Remember
- Patience is the key to avoiding any amateur errors that you are vulnerable to during the project
- You can only work on one project at a time unless you have different braiding disk to work with
- You can use the internet to research and find out the unique designs and knots to practice for your bracelet crafting
- Custom made friendship bracelets are the best for they show the passion in the gifting process and how it was all planned
As the love for thoughtful, meaningful gifts continues to grow, handcrafted friendship bracelets remain a timeless choice that reflects care beyond price. For those who prefer ready made designs alongside DIY inspiration, DreamPigeon offers a curated collection of beautifully crafted bracelets that celebrate connection, friendship, and personal style. Whether gifting a handmade piece or choosing a professionally designed bracelet, the true value lies in the emotion it carries and the bond it represents.